Dev Drive on Windows 11: how it works and when to use it Link to heading

In the post about why OneDrive is not for active development projects
, the central idea was to separate responsibilities: OneDrive is great as a vault for documents, deliverables, and filtered copies; it is terrible as a live workbench for node_modules, .venv, build cache, editor indexes, and thousands of files changing at the same time.
Dev Drive enters exactly that conversation.
It is not just a pretty name for D:. It is a Windows 11 volume type designed for development workloads: many small files, package restore, compilation, repository cloning, internal copies, caches, and tools that read and write all the time. The promise is not magic. It is simpler than that: reduce local friction where Windows would normally try to protect, index, filter, and verify every file operation as if everything were a user document.
Think of it this way:
- Git handles history.
- OneDrive handles documents and filtered backups.
- Fast local storage handles I/O.
- Dev Drive tries to be the best place, inside Windows, for the noisy part of development.
What Dev Drive is Link to heading
Dev Drive is a storage volume created for developer workloads on Windows 11. It uses ReFS, the Resilient File System, instead of NTFS, and receives specific security, trust, and file-system filter policies.
In practice, that means Windows treats the volume as a specialized area. It is not a special folder inside C:. It is not a sync setting. It is not just an antivirus exclusion. It is a volume formatted from the start as a Dev Drive.
That detail matters: Microsoft’s own documentation says existing volumes are not converted into Dev Drives. The designation happens when the volume is created and formatted. If you currently have a C:\Dev folder on NTFS, it can still be a good local organization choice, but it does not become a Dev Drive just because you rename it or apply a setting.
Why it can be better than a regular local volume Link to heading
A local NTFS volume is already much better than a real-time synced folder for active development. If the comparison is “Dev Drive versus OneDrive”, Dev Drive wins by category: it is not trying to upload every disposable cache file to the cloud.
But Dev Drive also tries to improve the comparison against a regular local volume, mainly for three reasons.
1. ReFS as the base Link to heading
ReFS is a modern Microsoft file system created for integrity, scale, and resilience scenarios. In Dev Drive, it becomes the base for development optimizations.
One relevant feature is block cloning. Instead of physically copying every byte in some compatible scenarios, ReFS can turn the copy into a metadata operation, making file regions share logical blocks on the volume. That reduces I/O and can speed up operations that copy, duplicate, or reorganize data.
That does not mean every command becomes instant. The gain depends on the tool, Windows version, file pattern, and operation type. But the direction is clear: less physical work for the disk when the file system can represent the operation more intelligently.
2. Microsoft Defender performance mode Link to heading
On a regular volume, real-time antivirus protection tends to work synchronously: you open or create a file, Defender gets in the path, scans it, and only then the operation continues.
On a trusted Dev Drive, Microsoft Defender can use performance mode. The main difference is that scanning becomes asynchronous for files on that volume: open now, scan later.
This is much better than adding a broad exclusion for everything. A normal exclusion can simply remove an entire tree from visibility. Performance mode tries to keep a balance: reduce the impact on developer flow without turning off protection for the rest of the system and without turning the folder into a lawless frontier.
There is an important condition, though: performance mode only works on a trusted Dev Drive, with Microsoft Defender as the primary antimalware and real-time protection enabled.
3. Filter control Link to heading
Windows uses file-system filters for antivirus, backup, encryption, monitoring, and other layers that observe or intercept operations. In normal workloads, this is a healthy part of the system. In development, especially with huge disposable trees, those filters can become accumulated cost.
Dev Drive gives administrators more control over which filters can attach to the volume. It is an advanced area, but it explains why the feature is not just a “fast folder”: there is a volume policy underneath.
How to create a Dev Drive Link to heading
The friendliest path is through the Windows interface:
- Open Settings.
- Go to System.
- Open Storage.
- Open Advanced storage settings.
- Open Disks & volumes.
- Choose Create Dev Drive.
In the official screenshots below, the option sits inside Disks & volumes, next to the VHD actions:
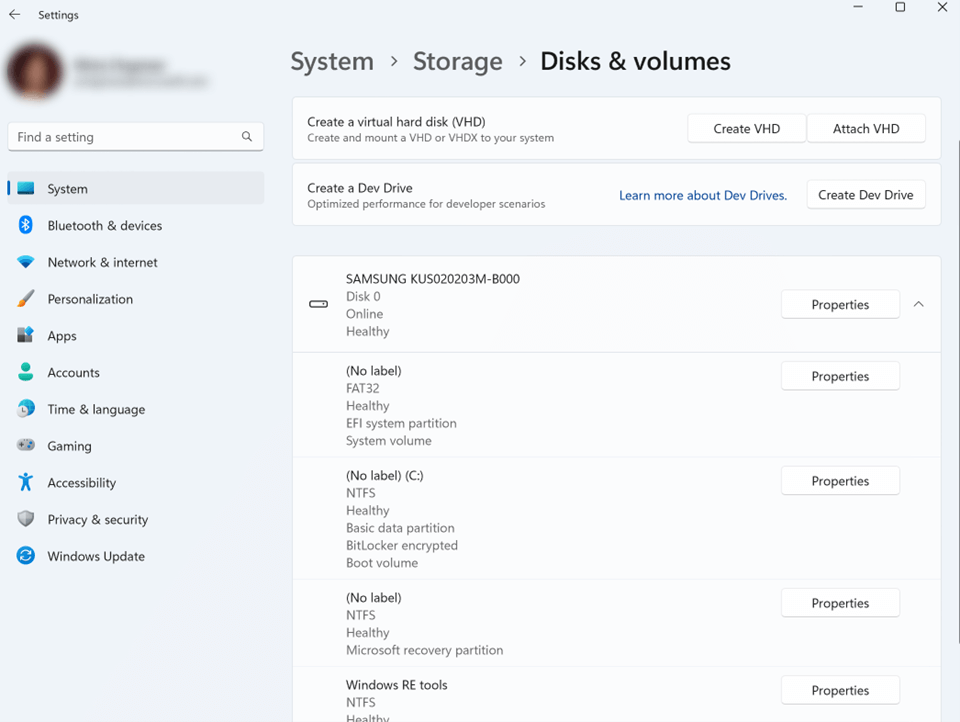
Source: Microsoft Learn: Set up a Dev Drive on Windows 11 .
During creation, you have three main paths.
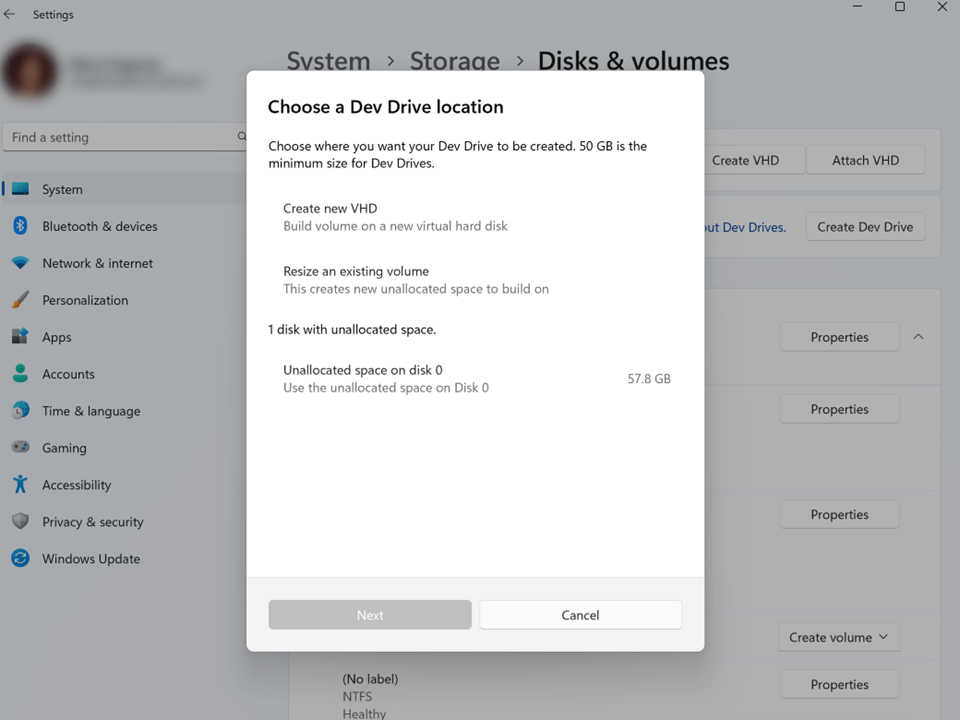
Source: Microsoft Learn: Set up a Dev Drive on Windows 11 .
Create a VHD or VHDX Link to heading
This is the most flexible option. Windows creates a virtual disk, attaches that disk as a volume, and formats the volume as a Dev Drive.
Microsoft recommends VHDX, not VHD. VHDX supports larger volumes and is more resilient to unexpected I/O failures, such as power loss.
You also choose the virtual disk type:
- Fixed size: allocates the full size at once.
- Dynamically expanding: grows as data is written.
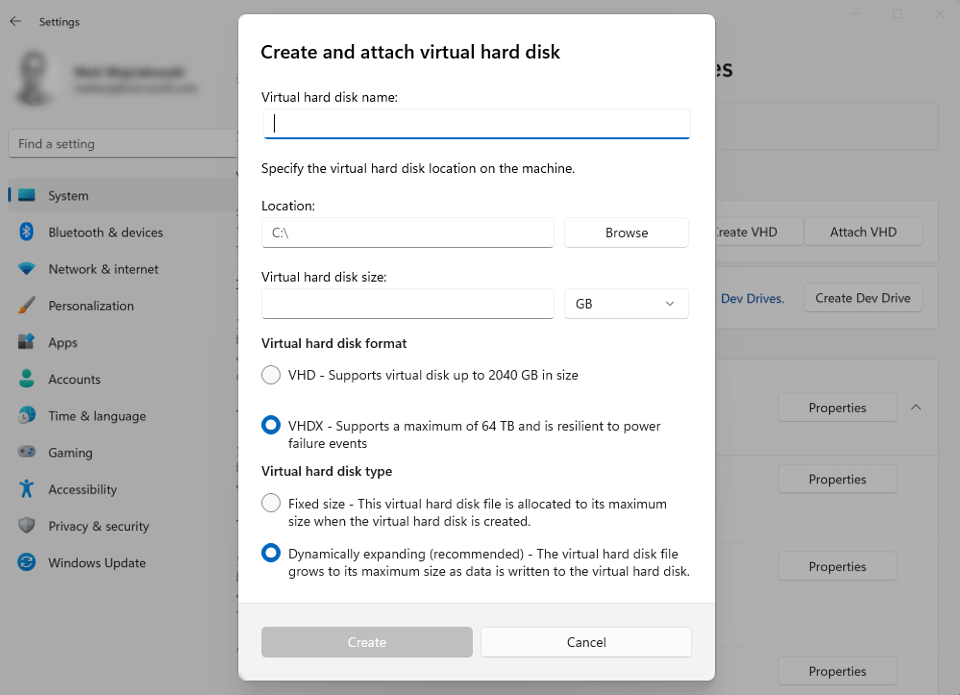
Source: Microsoft Learn: Set up a Dev Drive on Windows 11 .
For a personal environment, a dynamic VHDX is usually the least traumatic path. You get flexibility and can start with something like 80 GB, 120 GB, or 200 GB, depending on your project sizes.
The cost is one extra layer: a Dev Drive on VHDX can be a little slower than a direct physical partition because the virtual disk layer exists.
Resize an existing volume Link to heading
If you have available space on an internal disk, Windows can shrink an existing volume and create unallocated space. That space then becomes a new Dev Drive.
This path usually performs better than VHDX because it uses the physical disk directly. On the other hand, partition changes are more sensitive: they require backup, attention, and less improvisation. If something goes wrong or you choose a bad size, fixing it later can be more annoying.
Use unallocated space Link to heading
If the disk already has unallocated space, Windows can create the Dev Drive there. This is the cleanest scenario for someone who already prepared the partition layout or has a second internal SSD.
For a more serious development machine, especially with monorepos, Android, heavy .NET, large Node projects, or frequent builds, this is the neatest version of the story: a dedicated volume on an internal SSD, with no virtual layer and no OneDrive peeking over your shoulder.
Requirements before you start Link to heading
Before creating one, confirm the basic requirements:
- Windows 11 build
10.0.22621.2338or higher. - Local administrator permission.
- At least 50 GB free for the Dev Drive.
- At least 8 GB of RAM, with 16 GB recommended.
- Internal disk. Removable or hot-pluggable drives are not a good target for Dev Drive.
In corporate environments, Group Policy, Intune, and security rules can block or change the behavior. If the laptop is company-managed, the issue may not be technical in your user account; it may be IT policy.
What to configure after creation Link to heading
Creating the volume is only half the work. The other half is putting the right things there.
A practical layout would be:
D:\Dev\
  repos\
  packages\
    npm\
    pip\
    nuget\
    cargo\
    maven\
  temp\
If your Dev Drive is E:, replace D: with E:. The letter itself is not important. The boundary is: active code and noisy caches live on the Dev Drive; documents and backups stay outside.
Confirm whether the volume is a Dev Drive Link to heading
Open PowerShell or CMD as administrator and run:
fsutil devdrv query D:
This command tells you whether the volume is a Dev Drive, whether it is trusted, and which filters are allowed or attached.
To query all Dev Drives on the system:
fsutil devdrv query
Mark it as trusted Link to heading
New Dev Drives are normally created as trusted. If you moved, remounted, or need to confirm the policy, use:
fsutil devdrv trust D:
Then validate:
fsutil devdrv query D:
Trust here is not a moral badge. It is an operational decision: you are telling Windows that this volume contains development material you control and that you accept the security/performance balance of performance mode.
Enable Defender performance mode Link to heading
Defender needs to be up to date, be the primary antimalware, and keep real-time protection enabled. To force the policy through administrative PowerShell:
Set-MpPreference -PerformanceModeStatus Enabled
Then check the Windows Security app, under Virus & threat protection, to confirm Dev Drive protection appears enabled for the volume.
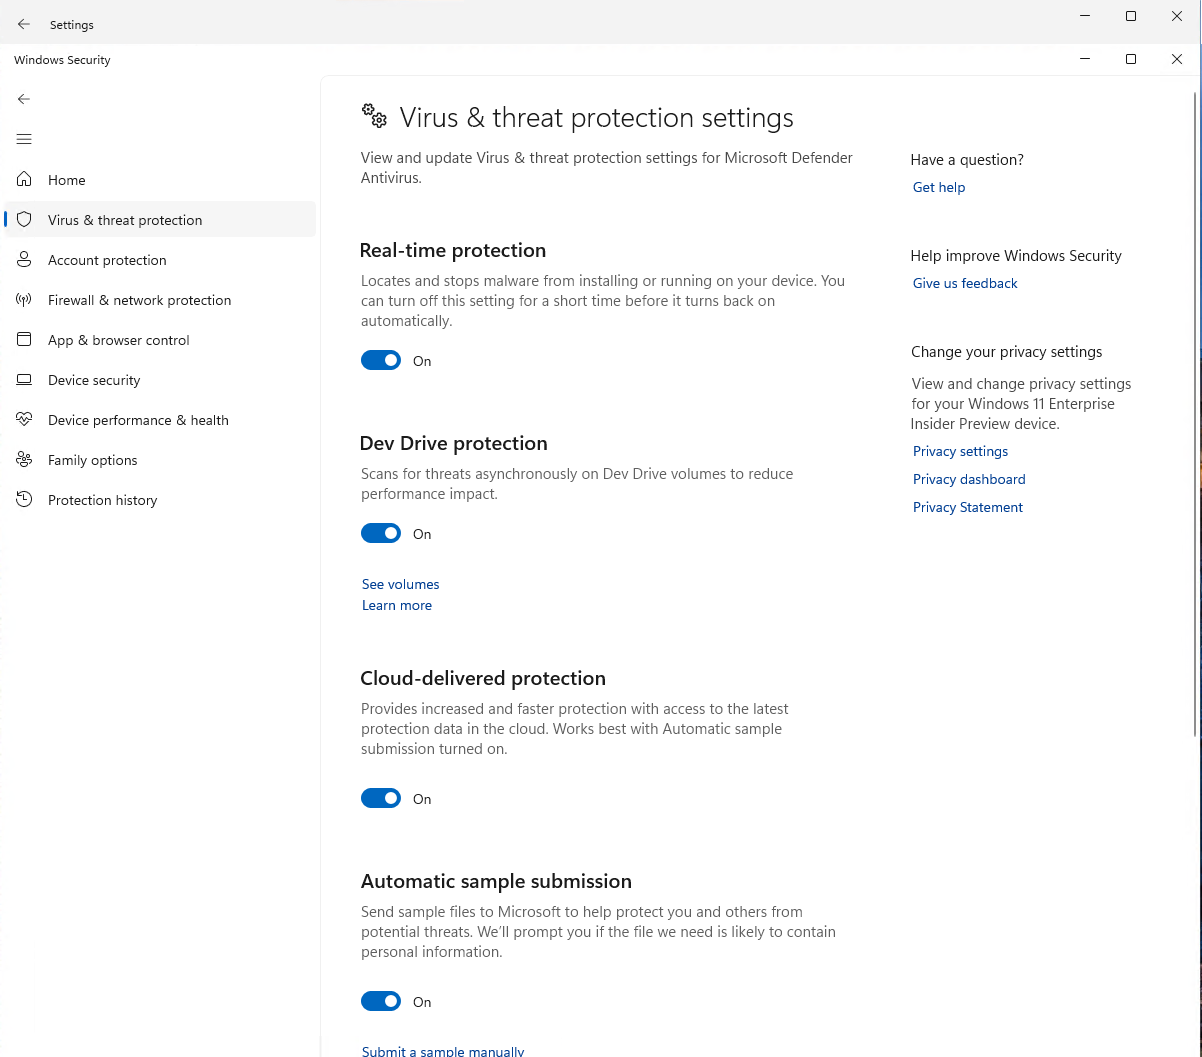
Source: Microsoft Defender for Endpoint: Protect Dev Drive using performance mode .
Move tool caches Link to heading
This is the adjustment many people forget. Cloning the repository on the Dev Drive does not help enough if half the heavy work is still written to %AppData%, %LocalAppData%, or the user profile.
For npm:
mkdir D:\Dev\packages\npm
setx /M npm_config_cache D:\Dev\packages\npm
For pip:
mkdir D:\Dev\packages\pip
setx /M PIP_CACHE_DIR D:\Dev\packages\pip
For Cargo:
mkdir D:\Dev\packages\cargo
setx /M CARGO_HOME D:\Dev\packages\cargo
For NuGet:
mkdir D:\Dev\packages\nuget
setx /M NUGET_PACKAGES D:\Dev\packages\nuget
For Maven:
mkdir D:\Dev\packages\maven
setx /M MAVEN_OPTS "-Dmaven.repo.local=D:\Dev\packages\maven"
After changing global variables, close and reopen terminals, IDEs, and editors. In some cases, restarting Windows is the simplest way to ensure every process inherited the new variables.
What to put on Dev Drive Link to heading
Put things there that are part of the active development cycle and can be rebuilt:
- Git repositories;
- project dependencies;
node_modules;.venv;- npm, pip, NuGet, Cargo, and Maven caches;
- build directories;
- temporary tool folders;
- IDE workspaces;
- large clones;
- generated trees that are not the canonical source.
The criterion is simple: if deleting it hurts little because you can rebuild it with Git, a package installer, or a build, it is probably a good candidate.
What not to put on Dev Drive Link to heading
Do not put there what should be preserved as a final document or single source of truth:
- contracts;
- invoices;
- client spreadsheets;
- final PDFs;
- personal photos;
- only-copy backups;
- sensitive files without encryption or a strategy;
- primary tool installers;
- the only place where important material exists.
Also, do not treat Dev Drive as a Git replacement. The volume can help your machine work better, but it does not record history, solve collaboration, or protect against human error.
Dev Drive, OneDrive, and backup Link to heading
The healthy design is:
D:\Dev\                  # Dev Drive, active work
  repos\
  packages\
  temp\

OneDrive\
  Documents\
  Deliverables\
  DevMirror\             # optional, filtered mirror
Dev Drive is the workbench. OneDrive is the vault. Git is the history. Backup is a separate conversation.
If you want to mirror part of D:\Dev to OneDrive, use a filtered strategy such as rclone, excluding dependencies, caches, builds, .env, credentials, and generated directories. The worst design is real-time sync trying to keep up with every file the compiler just spat out.
Dev Drive and WSL Link to heading
You can access Dev Drive files from a WSL distribution when they are on the Windows file system. But there is an important limitation: WSL’s metadata option, used to preserve Linux permissions and ownership on files hosted in Windows, is not supported on ReFS volumes.
So the practical rule is:
- Windows project, Windows tooling, Windows IDE: Dev Drive makes sense;
- Linux project with important Linux permissions: prefer WSL’s internal file system;
- simple mixed project: you can access Dev Drive through WSL, but test before making it the standard.
There is no shame in using both. The mistake is pretending the file system does not matter.
Useful administration commands Link to heading
Query:
fsutil devdrv query
fsutil devdrv query D:
Trust a volume:
fsutil devdrv trust D:
Remove trust:
fsutil devdrv untrust D:
Enable system support:
fsutil devdrv enable
Control allowed filters:
fsutil devdrv setFiltersAllowed /volume D: filterName
That last part is advanced. If you do not know exactly which filter you are changing and why, stay with the default. Microsoft itself recommends using the default performance mode configuration on a trusted Dev Drive.
When it is worth it Link to heading
Dev Drive tends to make more sense when you have:
- projects with many small files;
- frequent builds;
- heavy package restore;
- monorepos;
- Node, .NET, Java, Rust, Python, or Android with large caches;
- Defender active and visibly adding cost to file operations;
- an internal SSD with enough space.
It tends to matter less when:
- your projects are small;
- you almost never compile locally;
- the real bottleneck is CPU, memory, network, or a remote database;
- you mostly use WSL with files inside Linux;
- you expected it to replace backup.
Performance rarely has a single cause. Dev Drive improves one specific part: local storage for development workloads. If the problem is lack of RAM, a slow dependency, poorly parallelized tests, or a heavy container, it will not do much.
Practical recipe Link to heading
For a Windows development machine, I would do this:
- Keep tools installed on
C:, such as Visual Studio, SDKs, Windows SDK, and apps. - Create a Dev Drive on
D:orE:with at least 100 GB if there is room. - Use
D:\Dev\reposfor Git clones. - Use
D:\Dev\packagesfor npm, pip, NuGet, Cargo, and Maven caches. - Keep OneDrive out of the active path.
- Use GitHub, GitLab, Azure DevOps, or another remote for history.
- Use OneDrive or rclone only as a filtered mirror when it makes sense.
- Validate with
fsutil devdrv queryand confirm Defender performance mode.
It is less seductive than “save everything to the cloud and done”. But it is much more predictable.
Modern development already has enough complexity. The machine does not need to invent another silent fight between editor, build, antivirus, sync client, and cache. When every layer has a clear role, the environment becomes faster, easier to diagnose, and less irritating.
Quick checklist Link to heading
Before calling your D: a workbench:
- Is the volume really a Dev Drive?
- Was it created as ReFS?
- Does the volume appear as trusted?
- Is Defender in performance mode for it?
- Are your active repositories there?
- Have your package caches been moved?
- Is OneDrive out of the active path?
- Is Git still the source of history?
- Is there a backup or filtered mirror for what matters?
If those answers are good, Dev Drive is doing the right job: being a fast local area for the productive mess of development.
References Link to heading
- Microsoft Learn: Set up a Dev Drive on Windows 11
- Microsoft Defender for Endpoint: Protect Dev Drive using performance mode
- Microsoft Learn: fsutil devdrv
- Microsoft Learn: Block cloning on ReFS
- Microsoft Learn: Resilient File System (ReFS) overview
- Visual Studio Blog: Dev Drive for Performance Improvements in Visual Studio and Dev Boxes